Integrating with Home Assistant via MQTT and Setting Up Automations
This guide will walk you through integrating your Atmocube with Home Assistant using MQTT. We'll also cover setting up an example automation to alert you when CO2 levels exceed a certain threshold.
What is Home Assistant?
Home Assistant is a free and open-source software for home automation designed to be an Internet of Things ecosystem-independent integration platform and central control system for smart home devices, with a focus on local control and privacy.
Prerequisites:
Atmocube
A computer or device to set up Home Assistant OS on
Part 1: Installing Home Assistant
Step 1: Choose Your Installation Method
Home Assistant can be installed on various platforms. Choose the one that best suits your hardware and technical expertise:
Home Assistant OS: Ideal for a dedicated device like a Raspberry Pi or an old computer.
Home Assistant Container: For running Home Assistant in a Docker container.
Home Assistant Supervised: For a Linux system where you want Home Assistant and add-ons.
Home Assistant Core: For a Python virtual environment setup.
For this guide, we installed the Home Assistant Operating System on a Windows-based VirtualBox virtual machine using the steps here: Windows - Home Assistant
Step 2: Follow the Installation Instructions
Visit the Home Assistant installation page and select your platform for detailed installation instructions.
Once completed, you will be able to reach the Home Assistant interface at homeassistant.local:8123 using a browser.
Part 2: Setting Up MQTT in Home Assistant
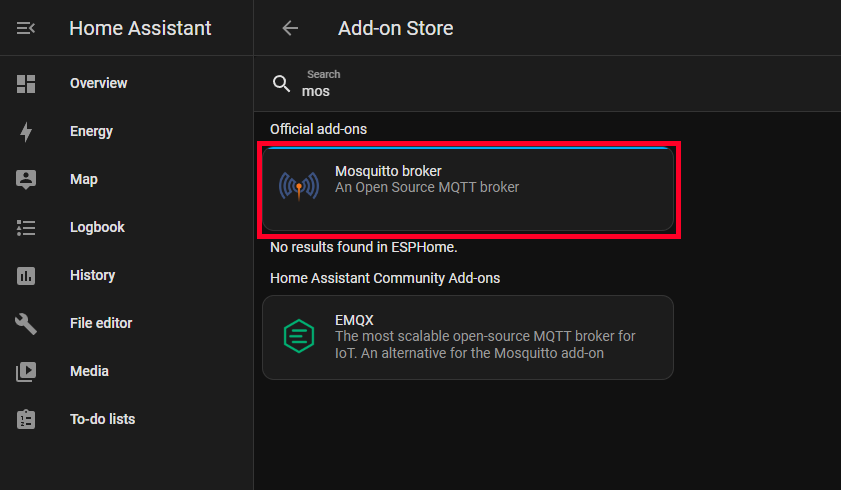
Step 1: Install the Mosquitto Broker Add-on
In Home Assistant UI, navigate to Settings > Add-Ons > Add-on Store.
Find and install the Mosquitto broker add-on.
Start the add-on.
Step 2: Configure Home Assistant MQTT Integration
Go to Settings > Devices and Services.
MQTT should appear as a discovered integration at the top of the page; if not, click + Add Integration and select MQTT.
Click the Configure button.
Click Submit if prompted, ‘Do you want to configure Home Assistant to connect to the MQTT broker provided by the add-on Mosquitto broker?’
Click Finish. You do not need to modify the Broker options here.
Step 3: Create an MQTT User
Navigate to Settings > People in the Home Assistant UI, then switch to the Users tab at the top of the window.
Create a new user that will be dedicated to the MQTT instance.
Note the username and passwordfor later use with the Atmocube MQTT configuration.
MQTT port: Enter the port number exposed by the MQTT server; this should be 1883, which is the default MQTT port.
MQTT security: depending on the type of authentication your MQTT server is using, select either MQTT TCP or MQTT TLS. For the purpose of this guide, we are using the simpler MQTT TCP.
For MQTT TCP, enter the username and password combination created in Part 2, Step 3 for the MQTT user in Home Assistant.
For MQTT TLS, enter the file names of the client certificates that should be placed on the USB drive along with the configuration file. Note that the MQTT broker settings within Home Assistant should also be modified if using TLS. The documentation for the Home Assistant Add-on: Mosquitto Broker can be found at this link.
After all details have been entered, click on the Generate Config button to generate the configuration file.
Save the generated config.json file to the root of a USB flash drive formatted with the FAT file system.
Disconnect the Atmocube from the power source (if powered on).
Insert the USB flash drive into the USB-A slot in Atmocube.
Re-connect the Atmocube to the power source.
Once the Atmocube is turned on, it will access the config.json file from the USB flash drive. The power status LED will turn a solid purple color to indicate that the USB flash drive has been detected.
The network LED turning green indicates that the connection to the MQTT broker was successful.
The connection can be verified by checking the Mosquitto broker log (Settings > Add-Ons > Mosquitto broker > Logs).
2024-02-21 15:48:05: New client connected from 192.168.10.185:50470 as {clientname} (p2, c1, k120, u'mqttuser').
The client name is the device ID of your Atmocube device in lowercase.
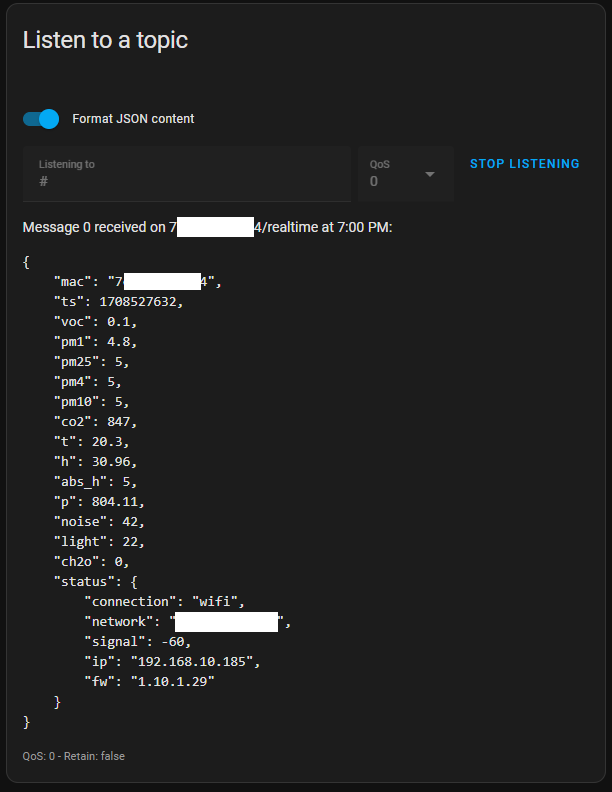
Check that the MQTT broker is receiving the data by going to Settings > Devices and Services > MQTT > Configure
Here, in the Listen to a topic dialog, enter ‘#’ (the MQTT symbol for a multi-level wildcard for all topic levels) and click Start Listening. Data from the Atmocube should appear (this may take a minute as data is received every minute).
Part 4: Setting Up MQTT Sensors in Home Assistant
Once we’ve verified that the MQTT broker is receiving data from the Atmocube, we can add the sensors as entities to Home Assistant.
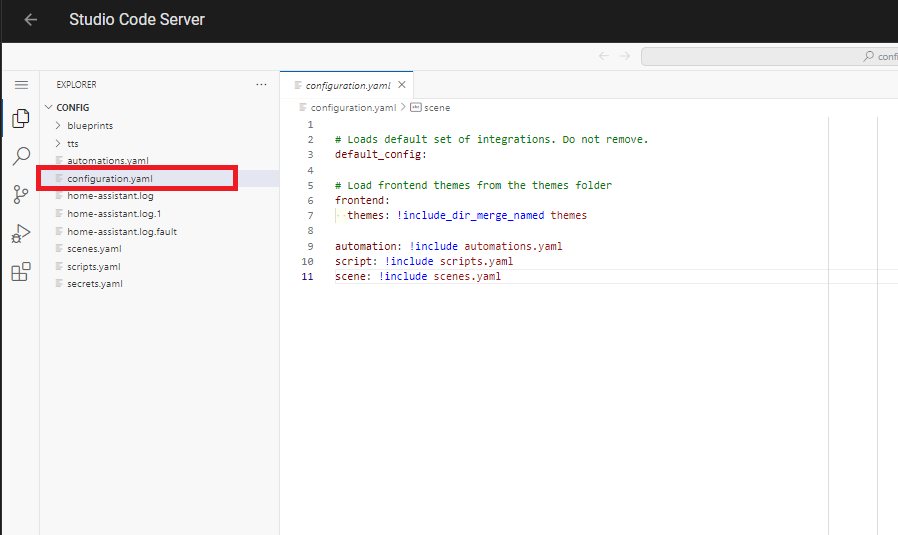
To configure Home Assistant to display data from the MQTT message received on the ‘{device ID}/realtime’ topic, we can define MQTT sensors in the configuration.yaml file. The easiest option to edit configuration.yaml is to use the Studio Code Server add-on. If unavailable on your system, use the File Editor add-on.
Open your configuration.yaml file in Home Assistant using the add-ons.
Add MQTT Sensor Configuration: In the configuration.yaml file, define your MQTT sensor(s) with the necessary parameters. Here's a basic template:
Replace {deviceID} with your Atmocube’s device ID in lowercase. You should already have this from Part 3, Step 13 above.
Step 2: Apply Configuration
Validate your configuration by going to Developer Tools>YAML in the Home Assistant UI and clicking on Check Configuration.
On the same screen, click Restart to apply the changes.
Step 3: View Sensor Data
Once Home Assistant restarts:
Navigate to the Lovelace Dashboard (Overview tab in the sidebar): The sensors should appear on the dashboard. If they don't show up automatically, you might need to add them manually.
Add the sensors to the dashboard (if necessary):
Enter Edit Mode by clicking the Edit Dashboard button in the top right corner.
Click on the + Add Card button.
In the Add Card menu, you can use the By Entity section to select the sensor entities to display or use the By Card menu to create a custom card for a specific sensor entity.
Configure a card (for example, a gauge card) by adding the sensor entity (for example, sensor.CO2), then click Save.
The sensor data should now be visible on your Home Assistant dashboard, updating in real-time as new data is published to the MQTT topic.
Part 5: Creating a CO2 Alert Automation
Step 1: Define the Trigger
Navigate to Settings > Automations & Scenes and click Create Automation.
Use the UI editor to set a trigger for your CO2 sensor entity, triggering for example, when CO2 is above 1000 ppm. (When>Add Trigger>Entity>Numeric State).
Set the Above mode to Fixed number.
Choose your CO2 sensor entity (e.g., sensor.co2) and set the Above value to 1000.
Step 2: Define the Action
Under ‘Then do’, click ‘Add Action’.
Here, you can choose from a variety of actions to perform when the trigger condition is satisfied.
For example, if you have a Google Nest device:
Choose ‘Call Service’ as the action type.
Select your TTS service, e.g., Text-to-speech (TTS): Speak
Note: You may need to create a Home Assistant Cloud account (Settings>Home Assistant Cloud) for some of these services to be available.
Specify a target device (Choose entity>Google en com)
Specify the media player entity ID, e.g., media_player.bedroom_speaker
Specify the alert message in the message field, e.g., “Warning, CO2 levels are above 1000 parts per million in the bedroom.”
Log in to the app and name your smartphone device.
Choose ‘Notification’ as the action type in the Home Assistant UI.
Choose ‘Send a notification via "your_smartphone_name.”
Enter a ‘message’ text and Save.
Step 3: Save and Test
Give Your Automation a Name: Something descriptive like "Warn about high CO2 levels."
Save: Click the Save button to create the automation.
Test: You can manually trigger the automation to test it by going to the Automations page, finding your new automation, and clicking on the "Run" button (play icon) in the hamburger menu next to it.
You've now installed Home Assistant, integrated your Atmocube via MQTT for real-time air quality monitoring, and set up an automation to alert you when CO2 levels are high.
By integrating Atmocube with Home Assistant, not only can you create automations for CO2 level alerts, but you can also craft a comprehensive air quality management system within your smart home using the plethora of integrations offered: https://www.home-assistant.io/integrations/
Here are some additional automation ideas that leverage the sensor data from Atmocube:
Adaptive Lighting Control: Utilize the Atmocube's light sensor readings to automate your home's lighting system, creating an adaptive lighting environment that responds to natural light levels.
Ventilation System Activation: Trigger smart windows or a ventilation system to open when the indoor CO2 levels rise above a certain point, indicating poor air circulation, and close them when outdoor air quality is poor or when the indoor air quality improves.
Humidity Regulation: Connect a smart humidifier or dehumidifier to maintain optimal humidity levels. For instance, activate a dehumidifier when the humidity exceeds 60% to prevent mold growth or turn on a humidifier if the air becomes too dry, indicated by a drop below 30% humidity.
Smart Thermostat Adjustment: Adjust your smart thermostat settings based on the Atmocube's temperature readings. If the indoor temperature is too high, which can exacerbate air quality issues, lower the thermostat setting automatically.
Health and Wellness Notifications: Send health and wellness tips or reminders to your phone or smart display based on air quality data. For example, suggest opening windows for fresh air when indoor VOC levels are high, or remind occupants to stay hydrated when the air is dry.
Sleep Environment Optimization: Create a bedtime routine that ensures the bedroom has optimal air quality for sleep. This could involve purifying the air, adjusting humidity, and setting a comfortable temperature an hour before your usual bedtime.
Outdoor Air Quality Monitoring: Combine Atmocube's indoor data with outdoor air quality data from an online API. Use this information to make informed decisions about indoor ventilation and when to engage indoor air purification systems.